Thursday, December 12, 2013

TWINE BALL LIGHT FIXTURE...

Look at my new Dining Room Light!!  Isn't it Fabulous???


I LOVE IT!!!  And I made it all by myself!!

I found this tutorial through Pinterest, and once we started working on the B.A.R. (Big Ass Room) - we recently painted all the brown paneling a lovely shade of gray and the honey toned baseboards/casings bright white, I knew this little DIY project would be perfect.

I did have one minor setback... It's Winter... Beach balls do not exist in stores in Virginia in the Winter.  So I had to order one from Amazon.  I was so frustrated that I had to WAIT.

Finally the ball arrived, and that following Saturday morning, I got up CRAZY early (like 4:30) to start working on it, before the two little people in my house woke up.

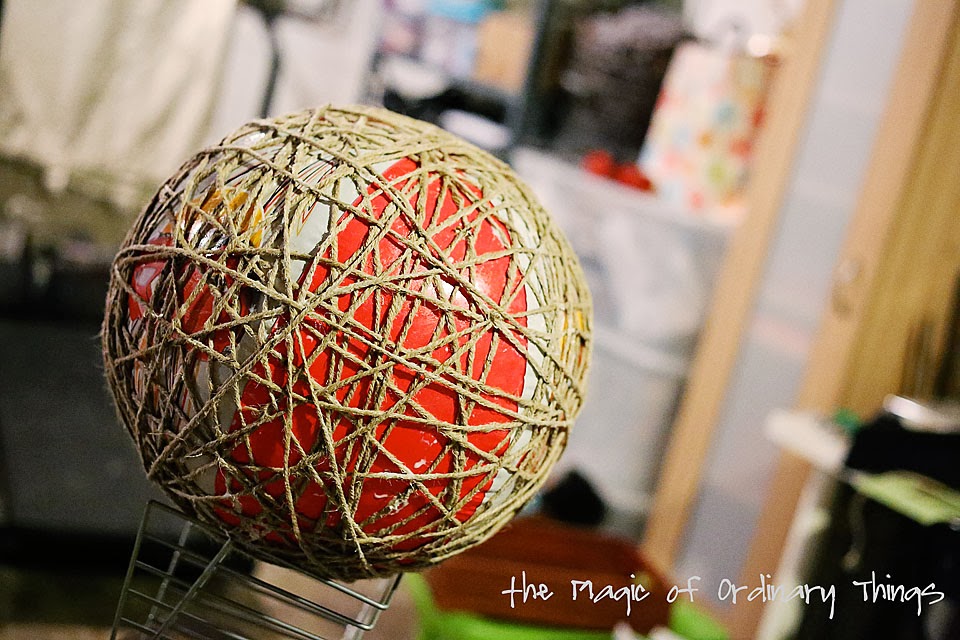
These first two photos are not that great because it's still dark out, and I'm in my basement.  These are the supplies that are needed, along with some warm water and a light kit.  I used one that I had from Ikea, from an old Japanese lantern.

So I followed the tutorial, and hung the ball so it would be easier to wrap the twine.  The only way I could see to hang it was by the rubber air stop thingy.  Well, after about 1/3 of the twine was wrapped, I guess the ball got to heavy, and the air stop thingy came open, and the ball started to DEFLATE.  

CRAAAAPPPPP!!!!!!!

Well, I couldn't let my project be completely destroyed, so despite all the glue/cornstarch mixture, I put the ball up to my face and started blowing.  Whew, project saved!!  And my face, mouth and tongue were covered in glue.  Yuck, but totally worth it!!

That little fiasco actually worked out for the best, because it turned out to be much easier to just have the ball lay on an old sheet while I finish wrapping the twine.  Then I had to wait 24 hours.


And it was so worth the wait...


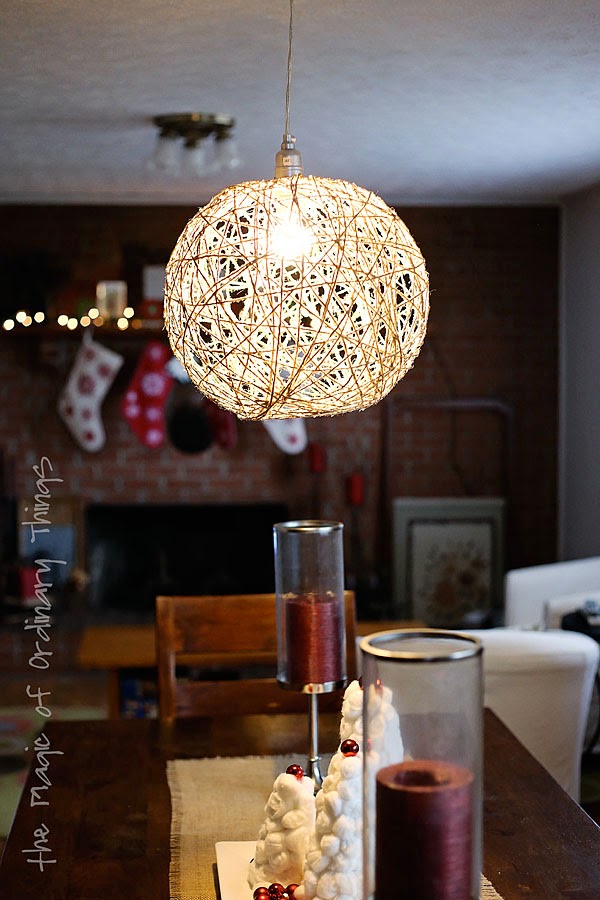
If you need a cute light fixture for somewhere in your home, I highly recommend this project!!  So easy, for such a huge impact.

Tuesday, November 26, 2013

BABY SHOWER CRAFTS...

Back in August, I co-hosted a baby shower for a dear friend of mine.  We wanted it for both Mommy and Daddy to be, so we decided on a Pot Luck Barbeque.  We were on a very tight budget and short timeline, so luckily, this kept me from going too over the top.  Everything that we did was simple and beautiful.

It all started with these Pom-Poms.  I saw them here, and knew they would be perfect for hanging over the food table.


Then I found this adorable Wish Mobile here.  The exact thing for friends and family to leave sentimental and loving notes for baby and Mommy and Daddy.


And then we added a few other crafty touches...

Isn't this Owl cake simply adorable?  I can not take credit for it, however.  The grandmother was kind enough to make it.  I knew she was bringing the cake, but I had no idea it would be this wonderful.


 It was supposed to have been a Surprise shower, but it didn't work out quite like that. However, both Mommy and Daddy to be, had a wonderful time and left with many gorgeous gifts for little Miss Elsie.

SLIME...

A few times this past summer, I helped out a friend and watched her boys.  The first time they came over, I planned a fun little craft that I knew would appeal to their ALL BOY personalities... SLIME

The ingredients are pretty simple - glue, Borax, food coloring and water - and glitter if you want a little extra sparkle.

Go here to see exactly what you need to do...

This time that we made it, I used white glue rather than clear glue.  Wasn't very fond of the color when it was all done.  We did make it one other time over the summer, and that time I made sure to get clear glue.  That time however, even though it looked better, I must have done something a little off in the recipe, because the texture and consistency of it felt different.

But honestly, all the little crafters could care less - they LOVED making it, and playing with after.

Definitely a HUGE HIT at our house!!!!


PALLET WALL / TABLE...

Not sure if you remember, but last summer (2012) I posted about a little criminal activity I participated in, when I went and "helped myself" to some discarded pallets left in a field.  Yes, there was a "No Trespassing" sign, but I ignored it.  I wanted some pallets - and they had been stacked there for over two years.  Would they really be missed?

Anyway, back to present day... I never did anything with those pallets I stole.

However, being that my husband is in the flooring industry, he has ready access to all types of pallets.  One day, he came home with (3) 7' x 4' pallets.  He knew I so desperately wanted to do some kind of project with pallets, so he thought he'd provide some so I wouldn't have to steal anymore.

Back to the "however"... we Finally did a project with pallets!!!


Isn't it A.MAZ.ING???  I LOVE IT!!!

It's out on our carport, which we use as a patio, and it hides some equipment that we don't want seen from the road.  It also has a little potting table for all the gardening I do - NOT!  But it's there, ready to be a potting table, for whenever I decide to garden.

But it couldn't be Just a Pallet wall/table.  I had to "Pretty" it up a little...

First, it needed a shelf.  To hang the shelf, I needed something old.  I didn't have anything old, but I had recently seen something on Pinterest about making new metal rusty.  So, following the recipe here, I made two new, shiny "L" brackets nice and rusty, old looking.

Don't you love that old chain?  That is actually old and rusty. We dug that up in our yard.


The most liberating thing about this whole project, was that we measured NOTHING.  The hubbs just eyeballed and guessed at everything.  It gives it such an organic feel.

The last little touch, was a piece of art.  This is one of my favorite photos that I took of my favorite flower.  It's an image transferred to a piece of wood.  You can see how I do this here.

So there you have it, I finally have a Pallet project in my home.  Well, outside my home, on the carport.

BIRTHDAY YUMMINESS...

My little Porkchop turned 4 back in May.  For his Birthday this year, he got to enjoy two different yummy things.  

First, were these Adorable Lego Brownies.  Inspiration found here.  I made these for him to take to school for his classmates.


Then for our little family celebration, I made a Frozen Ice Cream Cake.  You want to know the really sad thing... it's now the end of November - I made this back in the middle of May, and I have no recollection of how I did it.  So, base on the next picture, I'm going to wing the instructions...  Honestly, I don't really think it can be messed up.  To start, here are the ingredients - simple enough.

In the bottom of a casserole dish, add a layer of ice cream sandwiches - then cover with Magic Shell.  Then add a layer of Cool Whip and a layer of crushed Oreos.  Then repeat - ice cream sandwiches, Magic Shell - but then switch and do the Oreo layer with the last layer being the Cool Whip.  

Then Freeze and Enjoy!!


My little guy did...


FABRIC TRAYS...

Every spring, at the end of the school year, I always try to make something for my kids teachers.  I never seem to have them done in time for Teacher Appreciation Week, but always in time for a little Good-Bye gift.

This past school year, I made these little fabric trays, by following the tutorial here.


So Fun!  So Easy!  So Cute!

SPONGE WATER BOMBS...

Hi!  Remember me?  The person who is supposed to be contributing to this blog.  I'm so sorry to let my followers down.  I'm sure I've lost a few of you over the last year.  Unfortunately, things in life change, and little time is left for crafting.  As much as I would love to do a new craft every day, every week, or every month - it just doesn't happen.  I thought this past summer would be filled with all sorts of wonderful crafty projects for the house, but instead, I went back to work - so now there's even less time - *sigh*.

However, as I thought back over the last few months, I did realize that there were a few things that I could share with you. 

The first being this... Sponge Water Bombs!  

Since we no longer live in a neighborhood that has a private beach on the lake, I knew I would need to come up with something to help my boys beat the heat.  After finding these sponge water bombs here, I knew they were the perfect cure. A trip to the Dollar Tree and I was all set to whip them up.   

If I remember correctly, I think I was able to make 10 bombs from the (2) 5-sponge packs I got for Two Bucks.  Pretty cheap entertainment right there.

Sadly, I think they only played with them "correctly" twice, before, the little destruction demons that they are, absolutely destroying them.  They either tore them completely apart, or ripped the sponge strips in two.  I was so heartbroken.  I know it was only $2 and about 15minutes of my time.  But I could just not understand why they would want to destroy something they were having so much fun playing with - I'll probably never understand boys.

Hopefully, if you decide to do this for your kids next summer, they'll last longer than ours did.


Wednesday, May 29, 2013

HOMEMADE GUMMY SNACKS...

I found this recipe a LOOOOONGGG time ago over at Six Sisters Stuff, and knew that someday I would try to make these for my boys, who LOOOOOOVE Gummy Snacks.


After getting lucky, a few months ago, at my son's pre-school's yard sale, and finding a Mold tray for just One Penny, I knew I was one step closer to getting these made.  Then this morning, during a routine trip to Walmart, I finally got the supplies - today would be the day!!

The supplies you need are some flavored gelatin and some unflavored gelatin.  
At Walmart, the Knox was $1.48 for (4)/.25oz packets, and the Jell-O was $.74 for a 3oz. box.  So all told, because I got two flavors - I spent just under $3.00.


Following the recipe from the above stated blog, this is how easy it is...

(1) 3oz. box of Flavored Gelatin
(2) .25oz packets of Unflavored Gelatin
1/3 C water.

Sprinkle all the gelatin over the water in a small saucepan.
Heat over medium heat and stir until all powder is completely dissolved.
Pour into molds
Let sit for at least 20 minutes. 
     When I checked them at twenty minutes, they were solid enough, but had a weird 
     texture when I tasted them.  I think I ended up letting them sit for a little over an 
     hour - by that time, they were the Perfect Gummy texture.

This is the Mold tray that I scored at the yard sale.  From the original blog, she said that they can be found at Walmart and craft stores.  I don't know if they're Jell-O brand, but anything with a small shaped mold would work.

For $3, I got (70), slightly larger than a jelly bean, Gummy snacks.  Not sure if that's
a savings or not, but they sure were easy to make.

 I'm sure we will be making a lot of these, in all different flavors, this summer.


POOL NOODLE RACE TRACK...

I'm pretty sure I saw this idea a while ago, but just never got around to buying the supplies.  But after reviewing projects to do this summer with my boys, I knew it was time to make the Pool Noodle Race Track...

So I went back and looked at this one over at Home Spun Threads, and this one at My Little Gems.  My initial intention, was to make it for cars, but the noodle I purchased at the Dollar Tree didn't have a big enough center hole, so I had to improvise.  Luckily, I had some 3/4" wooden beads in my craft supply stash - and they worked perfectly.
But of course, we couldn't just leave them plain wood... the boys went to town on them with washable markers, but after handling and playing with them for sometime, it seemed that their little hands were permanently dyed - thank Heavens for washable.

Normally, I would go over the top on a project like this... for instance, I would have had "Start" / "Finish" flags, and I probably would have covered the mailing box with something.  But instead, I actually took into account my boys track record of how quickly they can destroy something, so I didn't waste the time on things that would have looked great for photographs, but they could care less about.


It was a HUGE HIT!!  In this photo, I just know they are saying...

"Mommy, you're the BEST!!"

And of course, they totally proved me wrong and didn't destroy it... YET!


Related Posts with Thumbnails