Thursday, October 28, 2010

SALTED CARAMEL CUPCAKES

YUMMMMMMMM............
Sea Salt, Caramel, German Chocolate, Toffee Bits & Buttercream Frosting... Do I need to say more? This combination is Absolute Perfection!!!
I saw the recipe for these delectable treats a few months ago, via one of the many Linky Parties I visit on a regular basis. Yesterday, I was having a SERIOUS craving for something sweet, so I thought it was about time to whip up a batch.

Thank you to a fellow Virginian at Me and My Pink Mixer for introducing me to this scrumptious little dessert.

If you would like to try to make these for your selves (and maybe share with others), go here for the Cupcake recipe and here for the Buttercream Frosting recipe. They are VERY easy to make and I guarantee they will make you Happy.

Monday, October 25, 2010

HUMOROUS DECORATING

Illustrated below, is how to decorate your bookshelves in a kid friendly manner.


Thursday, October 21, 2010

Sunday, October 17, 2010

PRODUCT REVIEW AND GIVEAWAY

Teresa over at Fun Fritz Family is doing a product review and Giveaway of my Etsy Shop Totes.
Be sure to go visit her Blog and enter the Giveaway.

Monday, October 11, 2010

HALLOWEEN WREATH... TAKE TWO!!

If you saw my post from last week regarding my Candy Corn Twig Wreath, then you know that within 24 hours of creation, it started to have issues. One, it was a major attraction for bees...
and Two, the candies started to melt.
So even though it hadn't even been hanging for 48 hours, on Sunday morning it was taken down and dismantled. Now what to do?

Never fear... I had another vision...

How about, styrofoam, toothpicks, and spray paint?

Here's my SECOND Halloween Wreath
I had talked to my Mom last week about a Christmas decoration that we had while I was growing up. It was a little Christmas tree made out of styrofoam balls and toothpicks, and had little red ornaments. I knew she had made it (some 35? years ago), so I got the details because I wanted to make one just like it. Then my mind starting churning... why not use the same concept for a wreath? And why not try it for Halloween?

Yesterday afternoon, I was off to the craft store. I had to go to Joann's because the greatest craft store EVER didn't have it's Grand Opening until today. And can you guess what store I'm talking about? Wait for it......

HOBBY LOBBY!!!!!! I can't even tell you how excited I am that the area of the country in which I reside, is FINALLY getting a Hobby Lobby. And can you believe it, I DID NOT go to the Grand Opening? I'm not able to make it there until this Wednesday, and the anticipation is killing me!!!

Anyway, back to the project...

Here are the list of supplies:
- wire hanger
- 3" styrofoam balls (I bought [2] 6 packs and used [11])
- 1600 round toothpicks (not colored) I pretty much used ALL of them
- spray paint (I used Valspar - Black Satin)
- small ornaments (the kind that have a hanging collar that can be removed so the bulbs can be slid onto the toothpicks)
- ribbon
After bending and molding the wire hanger into an approximate 12" circle, I slid the styrofoam balls onto the wire. Once they were all into position, I wrapped the two hanger ends around each other to secure the balls into place.
And then the fun (and a little bit of pain) began!!!! Cover the balls with toothpicks. I did not cover the entire ball - I didn't do the backs. This part of the project is time consuming and can be a little "prickly".
Once the balls are sufficiently covered to your liking, then you can spray paint. This was my first spray paint job EVER. What fun!!! Why did I wait so long? Can't wait to spray a lot more stuff.
After the paint dries (maybe 15 minutes) then you can add the ribbon and the ornaments.

Just think of the endless possibilites for ALL the holidays.

I'm linking up here. Go check them out to see all the other great ideas.
mmm buttonSYS ThursgiveawaysJoin  us Saturdays at tatertotsandjello.com for the weekend wrap    up           party!UndertheTableandDreaming

This project was Featured here...
Sassy SanctuaryUndertheTableandDreaming


Sunday, October 10, 2010

JUMPING ON THE BANDWAGON

For the last couple of weeks, ALL OVER the craft blogging world, I have been seeing different versions of "Specimen" Art like these...

Jen at Tatertots & Jello created Bat Specimen Art

Jenny at Embellishing Life created Pumpkin Patch Art

I believe the original inspiration came from something being sold by Pottery Barn,
for I'm sure a ridiculous amount of money.

Well anyway, I decided I didn't want to be left out, so I jumped on the "Specimen" Art Bandwagon. The choice for my "Specimen" was based on what my Cricut cartridges had to offer. Since I only have (2) Shapes cartridges, I really only had ONE choice... a Leaf.

Here's my Oak Leaf Specimen Art
I got the frame at the Dollar Store for five bucks. It's a nice bronzey color so I thought it would look great with fall colors. Using scrapbook paper scraps, I cut (20) 1" leaves of various fall shades, and then I cut (20) 1.25" leaves out of the same black paper as my background.
I then used craft foam to act like little spacers to give a little relief to each leaf. The black leaf is elevated, and then the colored leaf on top is also elevated. I think it gives it nice dimension.


I added it to my Mantle Scape this morning.
since my husband's deer head is such a prevalent
part of our mantle, I had to include it in the decorations.
it's antlers make great hanging hooks.

I'm link up here. Go check them out to see all the other great ideas!!
mmm buttongiveawaysJoin  us Saturdays at tatertotsandjello.com for the weekend wrap    up           party!UndertheTableandDreaming
This project was Featured here...
UndertheTableandDreaming

Friday, October 8, 2010

I'M. NOT. SURE. IF. THIS. WORKED...

So... I had this vision....

If you saw my previous Halloween Inspiration post, then you know I am in love with the Candy Corn Tree I originally saw here. With that idea in mind, I thought I could make a Candy Corn Twig Wreath. I live in the woods so sticks and twigs are abundant. This is my attempt.
I had the twig wreath from a local raffle that I had won a few weeks ago. Before I used it for this project, it was covered in obnoxious silk daffodills... basically it was U.G.L.Y. So it was begging for a re-do. It knew it was ugly, and it wanted to be pretty.
Well, I don't know that it is now pretty, but it's definitely different. I collected some small branches from our woods and tucked them into the twig form. Then to secure them somewhat into place, I haphazardly (sp?) wrapped rope around them and the wreath.
Then I went to town with my glue gun, adhering candy corn to all the branch and limb ends (question... are they really limbs when they're that tiny?)
It's all so random and chaotic... and organic, but does it work?
Let me know your thoughts on whether you think this project was a success or disaster.

Happy Halloween!!

UPDATE: This is hanging outside on a North facing wall. However, this morning (10.9.10), when it got hit by a little bit of sun, the candies started to melt. Also, the bees LOVE it. So, if any of you out there want to give this a try, you might want to hang it inside or make sure it gets no direct sunlight. I don't know if spraying the candies with some kind of sealant would help, but actually, not sure if that would even be worth it. This is definitely not something that can be saved for use next year... it's a yearly project.

I'm linking up here. Go check it out to see all the other great ideas.
Join  us Saturdays at tatertotsandjello.com for the weekend wrap   up           party!
halloween bats
UndertheTableandDreaming mmm buttonSYS Thursgiveaways
I guess it worked and you all loved it, because I was Featured...
UndertheTableandDreaming

Friday, October 1, 2010

A YUMMY "THANK YOU"

On Monday of this week, two of our friends helped me in a BIG way!! The new Gorilla "Playset" ("Jungle Gym" to us older folk) that we ordered for our boys, was delivered. Since it was delivered (in the rain BTW) while my husband was at work, two of our friends, Jim Usas and Keith Myers, were kind enough to come and help me out. Once the work was done, I gave them both a big hug and told them I would be baking them cupcakes as a thank you.

Then, I had a better idea...
Just a little back-story... earlier this year, I was seriously craving a Sugar Cream Pie. It's a dessert that I enjoyed while growing up, and I hadn't had one in a LONG time. Then much to my delight, I opened my new issue of Country Living (sorry, I can't remember what month) and there it was - a recipe for "Hoosier Sugar Cream Pie". It was definitely a sign, since I am a Hoosier born and bred. I made one back then for my Bunco friends, and they all really enjoyed it, so I thought it would be perfect for this occasion.

So instead of cupcakes for Jim and Keith, I decided to bake two Hoosier Sugar Cream Pies.
I gathered all the needed ingredients.
I then combined ALL the ingredients.
Then mixed them.
Then poured them into the pie-crusts, and...
sprinkled them with sugar and cinnamon.
After about an hour (can you imagine how absolutely yummy my house smelled?), I took them out of the oven and...
let them cool on wire racks. Good thing I put them on a cookie sheet, since one of them spilled over a little bit.

Now, you know me, I couldn't just show up with a plain pie. While the pies were cooling, I did a little paper crafting on my Cricut.
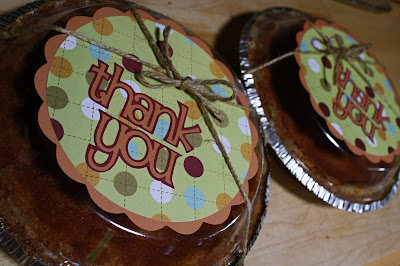
All ready for delivery.

I delivered them last night right after dinner so Jim and Keith and their families would have a yummy dessert.

Now here's the recipe if you want to make this pure Yumminess...

2 cups heavy cream
1/2 cup all-purpose flour
1/2 cup brown sugar
1/2 cup granulated sugar, plus 3 tbs for sprinkling
1/2 cup whole milk
1 tsp vanilla extract
1 (9") store-bought piecrust
(**note - I didn't pay close attention to this particular ingredient and bought a 9" pre-made graham cracker pie crust. If I were to do it again, I would probably still buy the graham cracker pie crust, but 10" rather than 9".)
1 tbs unsalted butter
(**note - since I bought the wrong pie crust, I didn't need butter)
1 tsp ground cinnamon

1. Preheat oven to 350 degrees F. For filling: In a medium bowl, combine heavy cream, flour, brown sugar, 1/2 cup of sugar, milk and vanilla.
2. Fit crust into a 9" pie pan and dot bottom with butter. Pour filling into crust. Combine cinnamon and remaining 3 tbs of sugar to sprinkle on top. Bake pie until set and center is firm to touch, about 1 hour. Cool on a wire rack.

Hope you try it. It's so very easy, and so very delicious.

I'm linking up here... go check it out to see all the other great ideas.
Join  us Saturdays at tatertotsandjello.com for the weekend wrap  up           party!UndertheTableandDreaming The Blackberry Vinegiveaways
Update: 10.7.10... This post was featured by Jen at Tatertots & Jello...
Yeah Me!!!
Related Posts with Thumbnails